 Pin it
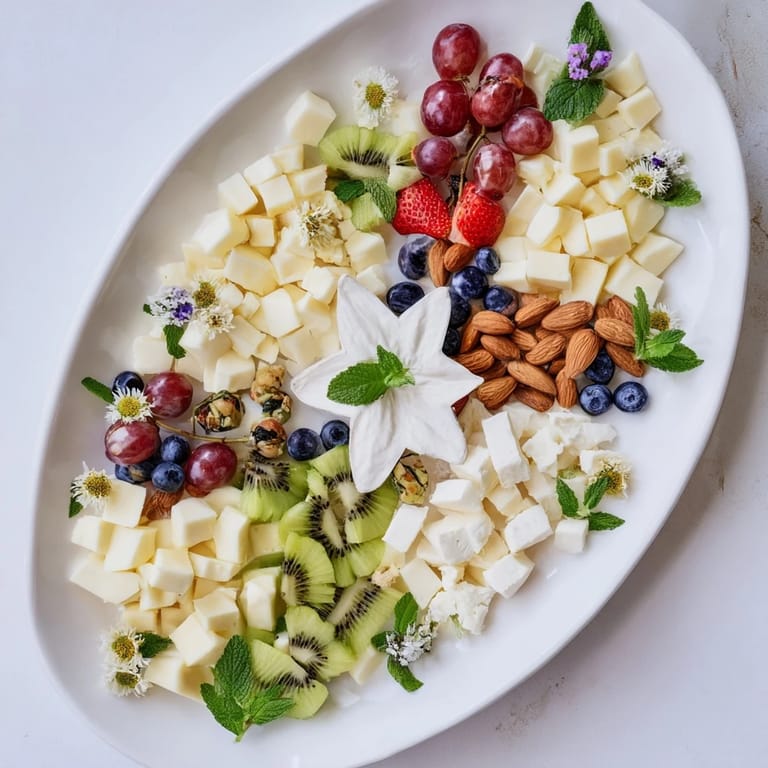
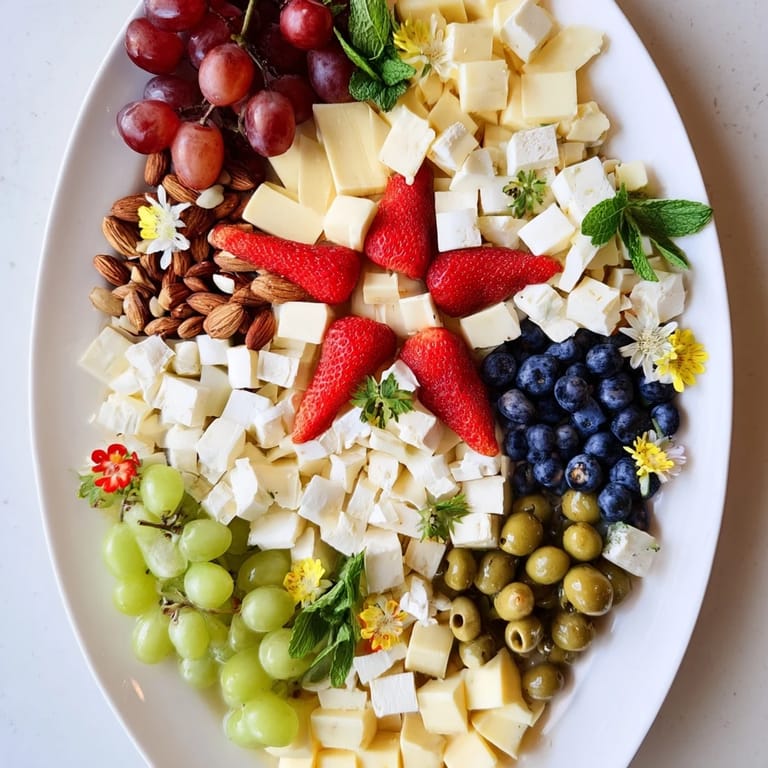
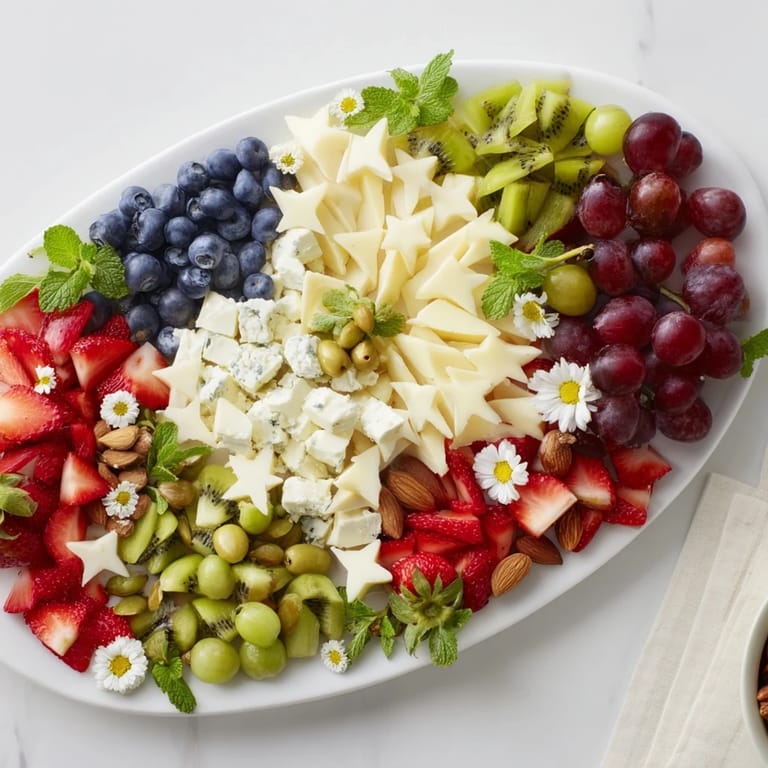
 I'll never forget the moment I realized that food could be art. I was flipping through a design magazine at a café, staring at negative space photography, when it hit me—why not create that same visual magic on a platter? That evening, I sketched a star on parchment, arranged cheeses and fruits around it, and when I lifted that paper away, my guests gasped. It wasn't just beautiful; it felt like I'd revealed something intentional and thoughtful. That's when The Negative Space Puzzle became my secret weapon for impressing people.
I made this for my sister's birthday dinner, spelling out her initials in negative space with soft cheeses and ruby-red grapes. When she walked into the room, she literally stood there for a full minute, just taking it in. She said it was too beautiful to eat—but she ate it anyway, and everyone else followed. That's when I knew this wasn't just a platter; it was a moment.
Ingredients
- Brie cheese, sliced (100 g): The creamy anchor of your platter—soft enough to feel luxurious but structured enough to position cleanly. I learned to slice it just before assembly so it stays supple and doesn't dry out.
- Manchego cheese, sliced (100 g): This brings a slightly nutty, firm presence that contrasts beautifully with the Brie. It holds its shape through the arrangement process, which matters when you're working around a precise design.
- Goat cheese, crumbled (100 g): The tangy surprise that adds depth. Crumble it by hand rather than with a fork—you'll get better texture and it feels more intentional when you're placing it.
- Seedless red grapes (1 cup): These are your workhorse. They're uniform, they roll into curves beautifully, and their deep red creates striking contrast against lighter cheeses. Buy them a day ahead so they're perfectly chilled.
- Strawberries, halved (1 cup): The jewel tones here add visual drama. Halve them just before assembly—cut strawberries weep if they sit too long, and you need that clean appearance for your negative space.
- Kiwi, sliced (1): Those bright green wheels are pure visual gold. They're also sturdy enough to position precisely, and their slight tartness keeps everything from feeling too rich.
- Blueberries (1/2 cup): These fill tiny gaps and add depth with their dark, jewel-like color. They're also the most forgiving—they sit exactly where you place them.
- Thin crackers (12): These are your architectural elements. Choose ones with interesting shapes or textures; they become part of the visual composition, not just filler. I prefer ones that are sturdy enough to support a small piece of cheese.
- Roasted almonds (1/2 cup): Their warm golden color and texture add dimension. Roasting them yourself if you can—they taste better and feel more intentional. Use them to frame or define areas near your negative space.
- Green olives, pitted (1/4 cup): These bring an earthy color and sophisticated flavor. Their oval shape helps guide the eye around your design, so position them thoughtfully.
- Fresh mint leaves: The final flourish that says you care. They add freshness and movement to what could otherwise feel too still. Tuck them in last, like you're adding a signature to your artwork.
- Edible flowers (optional): If you can find them, they're the detail that transforms this from impressive to unforgettable. They're delicate, so add them right before serving.
Tired of Takeout? 🥡
Get 10 meals you can make faster than delivery arrives. Seriously.
One email. No spam. Unsubscribe anytime.
Instructions
- Choose Your Design:
- This is the magic moment. Sketch it on parchment first—a star, a heart, your guest's initials, whatever feels right. Make it big enough to read but not so massive that it dominates the platter. I usually aim for something that takes up about a third of the serving surface. Hold the parchment up to your platter and really visualize it before committing.
- Set Your Template:
- Lay that parchment on your platter as your guide. Secure it gently with a tiny piece of tape at one corner if needed, but be careful not to wrinkle it. This is your safety net for the next steps, so make sure the design is exactly where you want it.
- Build Your Border:
- Now comes the satisfying part. Start arranging your cheeses and crackers in clusters around the outlined design—but here's the key: leave that negative space completely empty. It's tempting to fill every space, but resist. The emptiness is your art. I like to place crackers first as anchors, then layer cheeses around them.
- Fill with Fruits:
- This is where you add color and movement. Take your grapes, strawberry halves, and kiwi slices and arrange them in the remaining gaps around the border. Work slowly and adjust as you go. The fruits should look intentional, not random. I usually create little color groupings—a cluster of grapes here, strawberries there—which looks more sophisticated than mixing them everywhere.
- Add Texture:
- Scatter your almonds and olives in small piles throughout. These aren't just ingredients; they're visual anchors that guide the eye. I place them in odd numbers (three almonds together, five olives in a cluster) because it feels more natural and artistic.
- Reveal the Magic:
- Here's the moment that never gets old. Carefully lift the parchment straight up, moving slowly so nothing shifts. If you've left the negative space truly empty, you'll see your design appear like magic. If something slipped into the space, gently nudge it away with a small spoon or your finger.
- Final Flourish:
- Tuck mint leaves artfully around the platter—not randomly scattered, but placed with intention. If you have edible flowers, add them now. They're delicate, so treat them like the finishing brushstrokes they are. Step back and look at your work. This is art.
- Serve with Intention:
- Bring the platter to the table and pause for a moment before anyone digs in. Let people admire it. Take a photo if you want—this is worth documenting. Then encourage your guests to enjoy it, knowing they're eating something created with care and creativity.
 Pin it
 What I love most about this recipe isn't actually the eating—though the mix of textures and flavors is wonderful. It's the conversation it starts. People linger, they talk about how creative it is, they ask how you did it. Food became a way to connect, to show someone they're worth the extra effort. That's something you can't taste, but you can definitely feel.
Adapting for Every Occasion
This platter is endlessly flexible, and that's part of its charm. For a dessert version, replace the cheeses and crackers with dark chocolate chunks, biscotti, dried apricots, and candied almonds. The negative space stays just as striking, but now it feels like a sweet finale to a meal. I've also done a breakfast spread version with soft cheeses, fresh berries, honeycomb crackers, and yogurt—same concept, completely different energy. The principle is always the same: the empty space is your signature, so choose complementary foods to frame it.
The Negative Space Philosophy
There's something deeply satisfying about creating beauty through restraint. In a world where we're taught that more is better, this platter asks: what if less is the statement? What if the absence of food is what makes people stop and notice? When you lift that parchment and reveal the intentional emptiness, you're not just serving food—you're serving a moment of visual calm in the middle of a busy table. That's why people remember it.
Pairing & Presentation Secrets
Serve this with sparkling wine or a crisp white wine—something that won't overpower the delicate flavors but will enhance the celebration. The bubbles feel right with this kind of food, and the acidity cuts through the richness of the cheeses beautifully. For presentation, choose a platter that contrasts with your foods. A dark slate or ceramic board makes the colors pop, while a light marble surface feels elegant and serene. Stand back and make sure your negative space reads clearly before guests arrive. The reveal should be unmistakable.
- If you're making this for a specific event, practice your design on parchment first—draw it a few times until it feels natural and readable
- Keep your assembly space clean and have small spoons or tweezers nearby for fine adjustments during the arrangement
- Never refrigerate after assembly; the cold makes fruits look dull and cheeses lose their silky texture. Room temperature shows everything at its best
 Pin it
 This recipe taught me that the most elegant dishes are often the simplest—not in ingredients, but in concept. There's no hiding behind technique here, just thoughtful arrangement and intention. Make it, and watch how something as simple as negative space becomes a conversation starter.
Recipe FAQs
- → What is negative space in food presentation?
Negative space refers to the intentional empty areas between food items to create distinct shapes or patterns, enhancing visual appeal.
- → How do you maintain the shape of negative space while arranging ingredients?
Using a parchment paper guide sketched with desired shapes helps keep spaces clear as cheeses, fruits, and nuts are placed around it.
- → Can this platter be adapted for different diets?
Yes, substituting ingredients like gluten-free crackers or choosing plant-based cheeses can easily accommodate dietary preferences.
- → What types of ingredients work best for this platter?
Firm cheeses, vibrant fruits, crunchy nuts, and crisp crackers provide contrast in texture and color, enhancing the negative space design.
- → Are there suggestions for serving occasions?
This artistic platter is perfect for parties, special celebrations, or any event where impressive presentation is desired.
- → How can the platter be customized for desserts?
Replace cheeses and crackers with chocolates, biscotti, and dried fruits to create sweet versions of the negative space design.